This site is no longer active or maintained. It is an archive of trainings 2013-2019 at Pu'u Kukui Elementary School.
Setting up iPhoto for our Yearbook-2016
Getting an album set up: It works great to use iPhoto for preparing pictures for our yearbook. To do this you would import pictures from your phone or iPad into the iPhoto application on your computer and then move them into an album that you created for the yearbook. Sometimes the transfer from the iPad is a little tricky and involves using iTunes to say that it's ok to use the computer. I can help you with this if you get stuck. Here's the steps.
Step 1: Transfer your photos from your phone or iPad into iPhoto (see directions below).
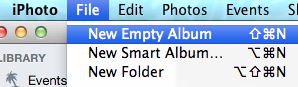
Step 2: Open iPhoto and go to the File menu and choose New Album (it might say New empty album).
Step 3: You'll find the new album in your left sidebar of iPhoto. Name that album with your name first, then a hyphen, and then yearbook16 (e.g., tisdell-yearbook16)
Step 4: Drag pictures from your photos or events into this album (use the command key on your keyboard to choose multiple images.)
Step 5: Debi will come to your room and put your album pictures onto a flash drive to be uploaded to our yearbook.

Transferring photos from digital camera, iPad or Phone:
We need to import pictures from your digital camera, iPad or phone before we can move them around in iPhoto. So follow the following steps to import and move pictures to your yearbook folder.
Step 1: Connect your digital camera, phone or iPad to your laptop. If you're prompted to open iPhoto when you connect the camera say Yes.
Step 2: When the pictures show up select the ones that you want to Import from your camera into iPhoto. You will need to hold down the command key when selecting multiple pictures that are not in sequence. Press the Import Selected button, or Import all.
Step 3: If you get prompted to erase the pictures from the camera you'll want to say NO. You can do this later - after you make sure that the pictures are ok.
Step 4: Look in the Last Import folder for the pictures that you just imported, command click on the pictures that you want and drag them on top of your Yearbook album (in the left sidebar). You should see an oval around your album and a little green ball with a plus sign when you try to drag your photos onto your new album. When you are over your album and see the oval and the plus sign release your mouse and you've transferred your pictures. You can click on your yearbook album to check and make sure the pictures have transferred.
Transferring from an iPad:
Step 1: Connect your iPad to your laptop. iPhoto should automatically open. If it doesn't you'll need to go into iTunes and read the prompts to authorize the computer to use the iPad. Then you can go back into iPhoto and do the same process that you did with your digital camera.
